OBD2/OBDII: The Ultimate Guide to Onboard Diagnostics
|
|
Time to read 6 min
|
|
Time to read 6 min
Introduction to Onboard Diagnostics (OBD)
Ever had your check engine light come on and wondered what's wrong? Modern vehicles are packed with technology that helps diagnose issues before they become major problems. That's where Onboard Diagnostics (OBD2) comes in. OBD2 is a system that allows your car to communicate with you about potential faults. In this guide, we'll break down how OBD2 works, why it's essential, and how you can use it to keep your vehicle healthy. Let's dive in!
Table of Content
The Transition from OBD1 to OBD2
Onboard Diagnostics (OBD) technology has come a long way since its introduction in the late 1960s.
Prior to the standardization of OBD systems, each manufacturer had their own protocols and connector types.
This led to inconsistencies in diagnosis and repairs.
In 1988, a collaboration between the SAE (Society of Automotive Engineers) and vehicle manufacturers led to the development of OBD1.
In 1996, OBD2 was introduced as a universal standard, mandating a standard diagnostics connector and trouble codes across all vehicles.
This shift allowed mechanics and vehicle owners to access real-time data and troubleshoot issues more efficiently. This lead to improvements in vehicle maintenance, emission control and overall reliability.
Following these implementations, the CAN Protocol (Controller Area Network) was introduced to OBD2 in 2008.
OBD2 Key Improvements
Understanding OBD2
What is an OBD2 Port?
The OBDII (Onboard Diagnostics) port is a universal connector that technicians can use to perform diagnostics on your vehicle.
The Onboard Diagnostics System is a built-in vehicle monitoring system that tracks and reports issues related to engine performance, emissions and other critical functions.
It continuously monitors the vehicle's Electronic Control Unit for faults and stores error codes. These are known as Diagnostic Trouble Codes or DTC's.
Using a scan tool mechanics and vehicle owners can communicate with the vehicle to collect data and diagnose faults.
Learn more about scan tools:
"The OBD System is a built-in vehicle monitoring system that tracks and reports issues related to engine performance, emissions and other critical functions."
OBDII Compatibility
Since its standardisation in 1996, OBD2 has been a universal system used in most vehicles worldwide.
OBDII compatibility means a vehicle is equipped with an OBDII Port and follows standardised communication protocols, allowing it to be scanned using any OBD2 compliant diagnostic tool.
Most petrol vehicles manufactured from 1996 onward in the US (and 2001 in Europe) are OBD2-compatible, with diesel vehicles following shortly after.
To ensure your vehicle supports OBD2 diagnostics, check for an OBD2 port and verify its compliance sticker.
Alternatively, you can click here to access a list of OBDII compliant vehicles in Australia.
Locating and Connecting to the OBD2 Port
Where to Find the OBDII Port in Your Vehicle
The OBD port is usually located underneath the dashboard. However, the location of the OBD connector is not standardised across all vehicles.
That being said, it is typically within 1 meter of the drivers' seat.
Here are some of the most common locations of the OBD2 Port:
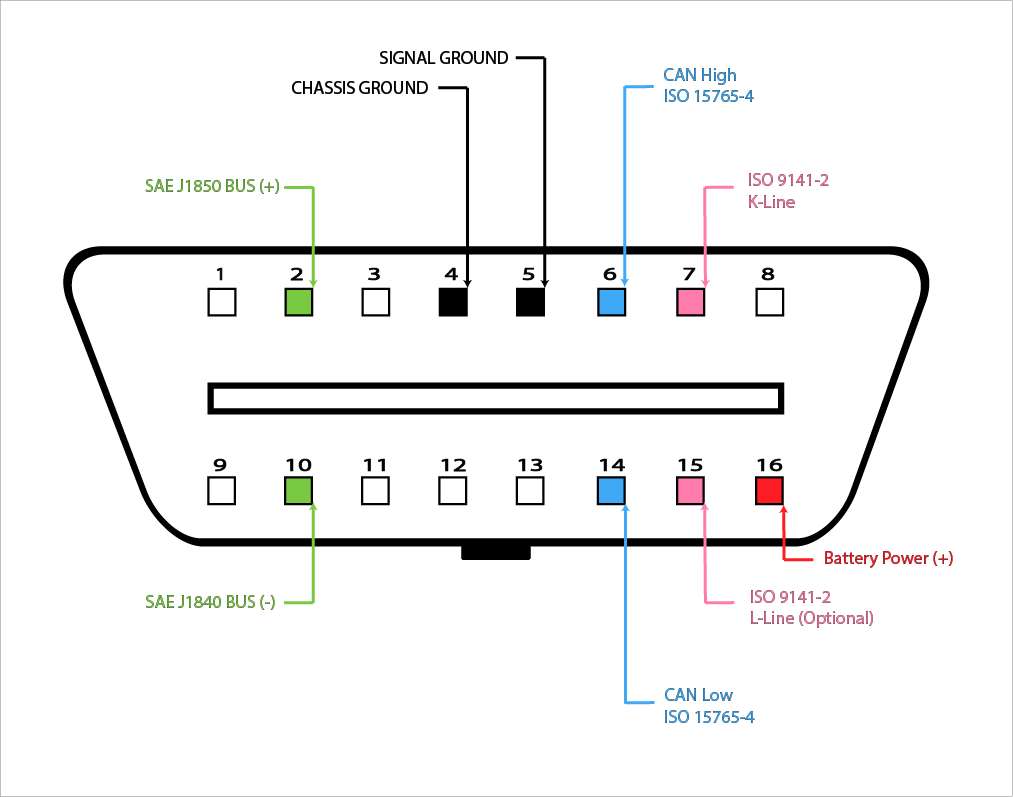
The OBD2 Diagnostic Connector Pinouts
Understanding the OBD2 Data Link Connector (DLC) pinout is vital for understanding the data available through the OBD2 port.
The OBDII port has 2 types of pins: manufacturer-specific and standardised. You can see the standardised pin layout on the image above. For manufacturer-specific information, you will need to refer to the factory wiring diagrams.
| PIN | Description | PIN | Description |
| 1 | Manufacturer-Specific | 9 | Manufacturer-Specific |
| 2 | SAE J1850 Bus (+) | 10 | SAE J1850 Bus (-) |
| 3 | Manufacturer-Specific |
11 | Manufacturer-Specific |
| 4 | Chassis Ground | 12 | Manufacturer-Specific |
| 5 | Signal Ground | 13 | Manufacturer-Specific |
| 6 | CAN Bus High | 14 | CAN Bus Low |
| 7 | ISO 9141-2 (K-Line) | 15 | ISO 9141-2 (L-Line) |
| 8 | Manufacturer-Specific |
16 | Battery Positive (Constant Power) |
Topdon TopScan PRO - A Powerful Scan Tool in Your Pocket
What Data can Be Accessed From the OBDII Port?
The OBDII port provides access to a range of data from the vehicle's monitoring systems. This includes live data from sensors and diagnostic trouble codes (DTCs).
When a vehicle is taken to a mechanic, they can connect a scan tool to the OBD port. This allows them to read DTCs and analyse data from the vehicles modules.
This includes data like:
And much, much more!
In fact, according to the ACKO Insurance blog, there are over 70 sensors in a modern vehicle!
How does OBD2 Communicate With Your Vehicle?
The Onboard Diagnostics system continuously monitors a vehicle's engine, emissions, and other key systems using an Electronic Control Unit (ECU) and sensors.
When an issue is detected, the ECU logs a DTC and, if necessary, will trigger the malfunction indicator lamp to alert the driver.
These codes can be read with an OBD2 scanner, allowing you to interpret and repair issues.
How to Read and Interpret OBD2 Codes
Reading and interpreting OBDII trouble codes is essential for swift diagnosis of vehicle issues. Here's a simple step-by-step guide:
Click here to learn more about diagnostic trouble codes!
Conclusion
Understanding OBD2 and onboard diagnostics is essential for maintaining modern vehicles efficiently. From its introduction in 1994, OBD2 has revolutionized how we diagnose and troubleshoot car issues. By using an OBD2 scanner , you can quickly read and interpret trouble codes , gaining insights into engine performance, emissions, and other critical systems. Whether you're a DIY car enthusiast or a professional mechanic, mastering OBD2 diagnostics can save you time, money, and unnecessary trips to the workshop. With the right knowledge, you can take control of your vehicle’s health and ensure it runs smoothly for years to come.
If you want to buy scan tools or other diagnostic and service equipment, you can check out more on our store!
Can an OBD scanner tell me what is wrong with my car?
An OBD2 scanner can retrieve Diagnostic Trouble Codes (DTCs) , which indicate potential issues with your vehicle. However, it won’t provide an exact diagnosis on its own—it simply points to the system or component that may be malfunctioning. You may need additional troubleshooting, research, or a mechanic’s expertise to determine the precise cause and solution.
What is EOBD?
EOBD (European Onboard Diagnostics) is the European version of OBD2, introduced in 2001 for petrol vehicles and 2004 for diesel vehicles . It follows similar standards as OBD2 but includes additional regulations specific to European emissions laws. If your car was sold in Europe after these dates, it is likely EOBD-compliant .
What year cars have OBD2?
OBD2 became mandatory in 1996 for all gasoline vehicles sold in the U.S.
EOBD (European OBD2) was required for petrol cars from 2001 and diesel cars from 2004 in Europe.
Other regions, such as Australia and Canada, adopted OBD2 standards in the early 2000s .
Do I need an OBD scanner?
If you want to diagnose check engine lights , monitor vehicle performance , or clear fault codes , an OBD2 scanner is a valuable tool. While not strictly necessary for casual drivers, it can save time and money by identifying issues before visiting a mechanic. For DIY car owners and professionals, an OBD2 scanner is an essential device for maintenance and troubleshooting.


